Äîêóìåíòàöèÿ è îïèñàíèÿ www.docs.chipfind.ru

General Description
The MAX1737 evaluation kit (EV kit) is an assembled
and tested PC board that implements a step-down,
switching lithium-ion (Li+) battery charger. It can be set
to charge 1 to 4 series cells. The cell voltage can be set
between 4.0V and 4.4V, using standard 1% resistors,
while maintaining 1% overall regulation accuracy.
The MAX1737 detects faulty cells and terminates
charging. Two capacitors are used to set the charge
termination, prequalification, and fault timeout periods.
Three LEDs indicate the charging status. A user-sup-
plied thermistor can be connected to the MAX1737 EV
kit to monitor battery temperature and suspend charg-
ing for over- and undertemperature conditions.
Features
o Complete Li+ Charging Solution for 1 to 4 Cells
o Low Heat and High Efficiency
o 300kHz PWM Operation
o Up to 28V Input Voltage Range
o 28-Pin QSOP Package
o Surface-Mount Construction
o Fully Assembled and Tested
Evaluates: MAX1737
MAX1737 Evaluation Kit
________________________________________________________________ Maxim Integrated Products
1
19-1884; Rev 0;12/00
Component List
PART
MAX1737EVKIT
0°C to +70°C
TEMP. RANGE
IC PACKAGE
28 QSOP
Ordering Information
DESIGNATION
QTY
DESCRIPTION
C1
1
4.7
µF, 10V X5R ceramic
capacitor
Taiyo Yuden
LMK316BJ475ML or
Murata GRM42-6X5R475K10
C2, C4, C7, C10,
C11
5
0.1
µF, 50V X7R ceramic
capacitors (0805)
M urata GRM 40034X 7R104K050
or
Taiyo Yuden
UMK212BJ104KG
C3
1
0.22
µF, 50V X7R ceramic
capacitor
Taiyo Yuden
UMK316BJ224ML
C5, C6
2
0.047
µF, 50V X7R ceramic
capacitors
C8, C9
2
0.1
µF, 50V X7R ceramic
capacitors (1206)
C12, C13, C14,
C21, C22, C23
6
1000pF, 50V X7R ceramic
capacitors
C15
1
68
µF, 20V, 0.150, low-ESR
tantalum capacitor
AVX TPSE686M020R0150
C18, C19
2
22
µF, 35V, 0.300, low-ESR
tantalum capacitors
AVX TPSE226M035R0300 or
Kemet T495X226M035AS
D1, D4
2
Schottky diodes, 3A, 40V
Fairchild MBRS340,
G ener al S em i cond uctor S S 34,
Motorola MBRS340, or
Vishay Liteon/Diodes, Inc.
B340
DESIGNATION
QTY
DESCRIPTION
D2, D3
2
Diodes 1N4148-type
Fairchild MMSD4148,
General Semiconductor
1N4148W, or Vishay Liteon/
Diodes, Inc. 1N4148W
JU1, JU3, JU4
5
2-pin headers
JU2, JU5
2
3-pin headers
JU6
1
4-pin header
JU7, JU8
0
Not installed
L1
1
22
µH, 2.8A inductor
Sumida CDRH124-220
LED1, LED2
2
Light-emitting diodes (green)
LED3
1
Light-emitting diode (red)
N1 (N1A, N1B)
1
Dual N-channel MOSFET
Fairchild FDS6990A
R1, R11
2
10k
±5% resistors
R2, R3, R4
3
1k
±5% resistors
R5
-R10
6
100k
±1% resistors
R12
1
0.05
±1%, 0.5W sense r esistor
Dale-Vishay WSL-2010-R050F
or
IRC LRC-LR2010-01-R050-F
R13, R14, R19,
R20
4
4.7
±5% resistors
R15, R17
0
Not installed
R18
1
0.1
±1%, 0.5W sense resistor
Dale-Vishay WSL-2512-R100F
or
IRC LRC-LR2512-01-R100-F
U1
1
MAX1737EEI
None
5
Shunts
For price, delivery, and to place orders, please contact Maxim Distribution at 1-888-629-4642,
or visit Maxim's website at www.maxim-ic.com.

Evaluates: MAX1737
MAX1737 Evaluation Kit
2
_______________________________________________________________________________________
Quick Start
The MAX1737 EV kit is a fully assembled and tested
surface-mount board. Follow the steps below to verify
board operation. Do not turn on the power supply
until all connections are completed. Observe all pre-
cautions on the battery manufacturer's data sheet.
Use only lithium-ion cells with this charger:
1) Set jumper JU6 to indicate the number of cells in
the battery pack (Table 1).
2) Place a shunt on jumper JU1 to disable the temper-
ature monitoring function.
3) Place a shunt across pins 1-2 on JU2 to enable the
MAX1737.
4) Place a shunt across JU3 to enable 2A charging
current limit.
5)
Place a shunt across JU4 to enable 2A input current
limit.
6) Remove any shunt from JU5 to set the cell voltage
to 4.2V. If a different battery regulation voltage is
required, refer to the MAX1737 data sheet.
7) Connect a +7VDC to +28VDC power supply with
sufficient power rating across the VIN and GND
pads.
8) Connect a lithium-ion battery pack between the
BATT+ and BATT- pads.
9) Turn on the power supply.
10) Measure the battery voltage and verify that the
LEDs indicate the correct state.
Detailed Description
When battery charging is initiated, the charger enters
the prequalification state. In this state, the batteries are
charged at 1/20 of the programmed current limit while
the charger measures the battery to determine if it can
be charged. If the battery voltage is above 2.5V per
cell, charging begins. At this time, the batteries are
charged at a constant current (Fast Charge state) and
a constant voltage (Full Charge state). The charger
exits the Full Charge state and enters the Top Off state
once the battery current drops to 10% of the Fast
Charge current, or the Fast Charge timer expires. The
charger remains in the Top Off state for 45 minutes, at
which time charging is terminated.
Once charging is terminated, if the battery voltage
drops 5% from the fully charged voltage, charging
automatically restarts.
If, at any time during charging, the thermistor input sens-
es a temperature below 0°C or above +50°C, charging
suspends until the temperature returns to a safe level. If
the charger is unable to enter the Fast Charge or Full
Charge state, charging is terminated and the Fault LED
(red) lights indicate a faulty battery. This kit is shipped
with a 10k
resistor to disable the temperature monitor-
ing function. If temperature monitoring is required, con-
nect the appropriate thermistor (see Jumper Selection
section).
For more information on the operation of the MAX1737,
refer to the Detailed Description section of the
MAX1737 data sheet.
Charging Status
The three LEDs on the EV kit indicate the charging status:
· LED1 (FULLCHG) indicates that the battery pack is
being charged with a constant voltage.
· LED2 (FASTCHG) indicates that the battery pack is
being charged with a constant current.
· LED3 (FAULT) indicates that charging terminated
abnormally.
Jumper Selection
Jumper JU1 connects the MAX1737 thermistor input
(THERM) to GND through a 10k
resistor, disabling
temperature qualification. To enable temperature quali-
fication (charging between 0°C and 50°C), remove the
shunt from JU1, and connect a thermistor (BC Compo-
nents part number 2322-640-63103 or equivalent) to
the THERM and GND pads. For more information, refer
to the MAX1737 data sheet.
The MAX1737 can be placed in shutdown mode using
jumper JU2. See Table 1 for jumper settings.
Jumper JU3 sets the charging current limit (current to
the battery). A shunt across this jumper limits the output
current to 2A. With the shunt removed, a resistor-divider
formed by R5 and R6 sets the current. The EV kit
comes with the resistors selected for a 1A current limit.
A different current can be selected by changing the
resistors (refer to the MAX1737 data sheet).
Jumper JU4 sets the input current limit (current from the
power supply). A shunt across this jumper limits the
input current to 2A. With the shunt removed, a resistor-
divider formed by R7 and R8 sets the current. The EV
kit comes with the resistors selected for a 1A current
limit. A different current can be selected by changing
the resistors (refer to the MAX1737 data sheet).
Jumper JU5 sets the voltage per cell. Jumper JU6
selects the number of series cells to be charged. See
Table 1 for jumper settings.

Evaluates: MAX1737
MAX1737 Evaluation Kit
_______________________________________________________________________________________
3
JUMPER
JUMPER POSITION
FUNCTION
Open
Open before connecting a thermistor from THERM to GND pads.
JU1
Closed*
Bypasses THERM with 10k
resistor.
1-2*
SHDN = high. MAX1737 enabled.
2-3
SHDN = low. MAX1737 disabled.
JU2
Open
Drive
SHDN pad with an external signal.
Open
ISETOUT = REF/2. Charging current limited to 1A.
JU3
Closed*
ISETOUT = REF. Charging current limited to 2A.
Open
ISETIN = REF/2. Input current limited to 1A.
JU4
Closed*
ISETIN = REF. Input current limited to 2A.
1-2
VADJ = REF. Voltage per cell = 4.4V.
2-3
VADJ = GND. Voltage per cell = 4.0V.
JU5
Open*
VADJ = REF/2. Voltage per cell = 4.2V. Set by resistor-dividers R9
and R10.
1-2*
CELL = GND. Cell count = 1.
1-3
CELL = VL. Cell count = 4.
1-4
CELL = REF. Cell count = 3.
JU6
Open
CELL = Float. Cell count = 2.
Table 1. Jumper Selection
*Default position
For other voltages, refer to the Setting the Battery Regulation Voltage section of the MAX1737 data sheet.
SUPPLIER
PHONE
FAX
AVX
803-946-0690
803-626-3123
BC Components
803-772-2500
Dale-Vishay
402-564-3131
402-563-6418
Fairchild
408-822-2000
408-822-2102
General Semiconductor
631-847-3000
631-847-3236
International Resistive Co.
(IRC)
310-322-3331
310-322-3332
Kemet
408-986-0424
408-986-1442
Motorola
303-675-2140
303-675-2150
Murata
814-237-1431
814-238-0490
Sumida
847-956-0666
847-956-0702
Taiyo Yuden
408-573-4150
408-573-4159
Vishay Liteon/Diodes, Inc.
805-446-4800
805-446-4850
Component Suppliers

Evaluates: MAX1737
MAX1737 Evaluation Kit
4
_______________________________________________________________________________________
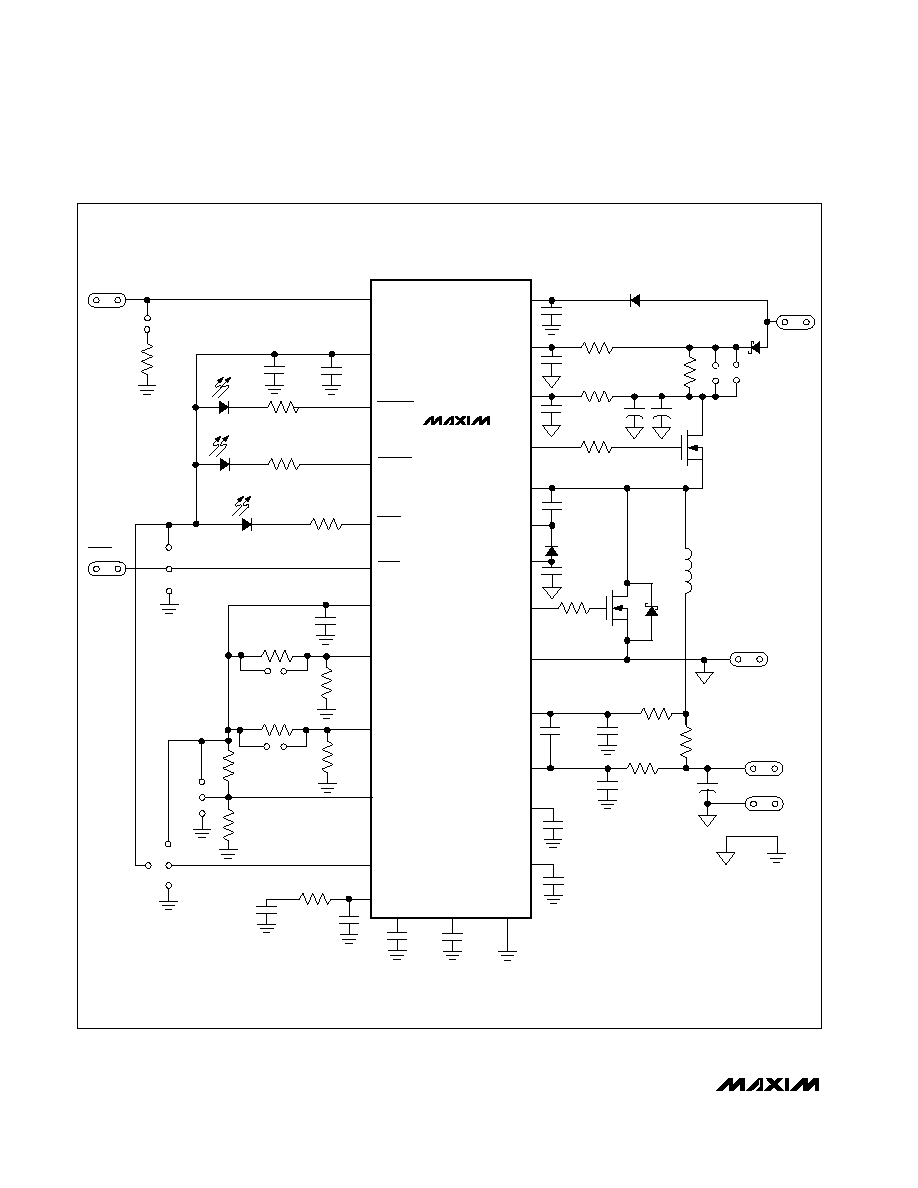
Figure 1. MAX1737 EV Kit Schematic
BATT-
BATT+
C15
68
µF
C14
1000pF
14
13
C13
1000pF
C23
1000pF
7
C22
1000pF
C12
1000pF
R20
4.7
R19
4.7
R18
0.1
1%
+
19
20
GND
N1B
D4
L1
22
µH
R17
(SHORTED BY
PCB TRACE)
C11
0.1
µF
21
23
22
C10
0.1
µF
D3
(SHORTED BY
PCB TRACE)
R15
24
25
C9
0.1
µF
R14
4.7
C18
22
µF
C19
22
µF
+
+
N1A
R12
0.05
1%
JU8 JU7
D1
VIN
D2
C7
0.1
µF R13
4.7
28
27
C8
0.1
µF
26
6
C6
0.047
µF
10
11
C5
0.047
µF
C21
1000pF
9
R11
10k
C4
0.1
µF
12
2
1
4
3
JU6
R10
100k
1%
3
2
JU5
1
R9
100k
1%
JU4
R7
100k
1%
R8
100k
1%
8
2
R6
100k
1%
JU3
3
C3
0.22
µF
5
18
15
16
17
1
4
C2
0.1
µF
C1
4.7
µF
LED1
LED2
R2
1k
R3
1k
LED3
R4
1k
JU1
R1
10k
THERM
JU2
1
2
3
SHDN
DCIN
CSSP
CSSN
DH1
LX
BST
VLO
DLO
PGND
CS
BATT
TIMER1
TIMER2
GND
CCS
CCI
CCV
CELL
VADJ
ISETIN
ISETOUT
REF
SHDN
FAULT
FASTCHG
FULLCHG
VL
THM
MAX1737
U1
R5
100k
1%
(JU7, JU8
NOT
INSTALLED)

Maxim cannot assume responsibility for use of any circuitry other than circuitry entirely embodied in a Maxim product. No circuit patent licenses are
implied. Maxim reserves the right to change the circuitry and specifications without notice at any time.
Maxim Integrated Products, 120 San Gabriel Drive, Sunnyvale, CA 94086 408-737-7600 _____________________ 5
© 2000 Maxim Integrated Products
Printed USA
is a registered trademark of Maxim Integrated Products.
Evaluates: MAX1737
MAX1737 Evaluation Kit
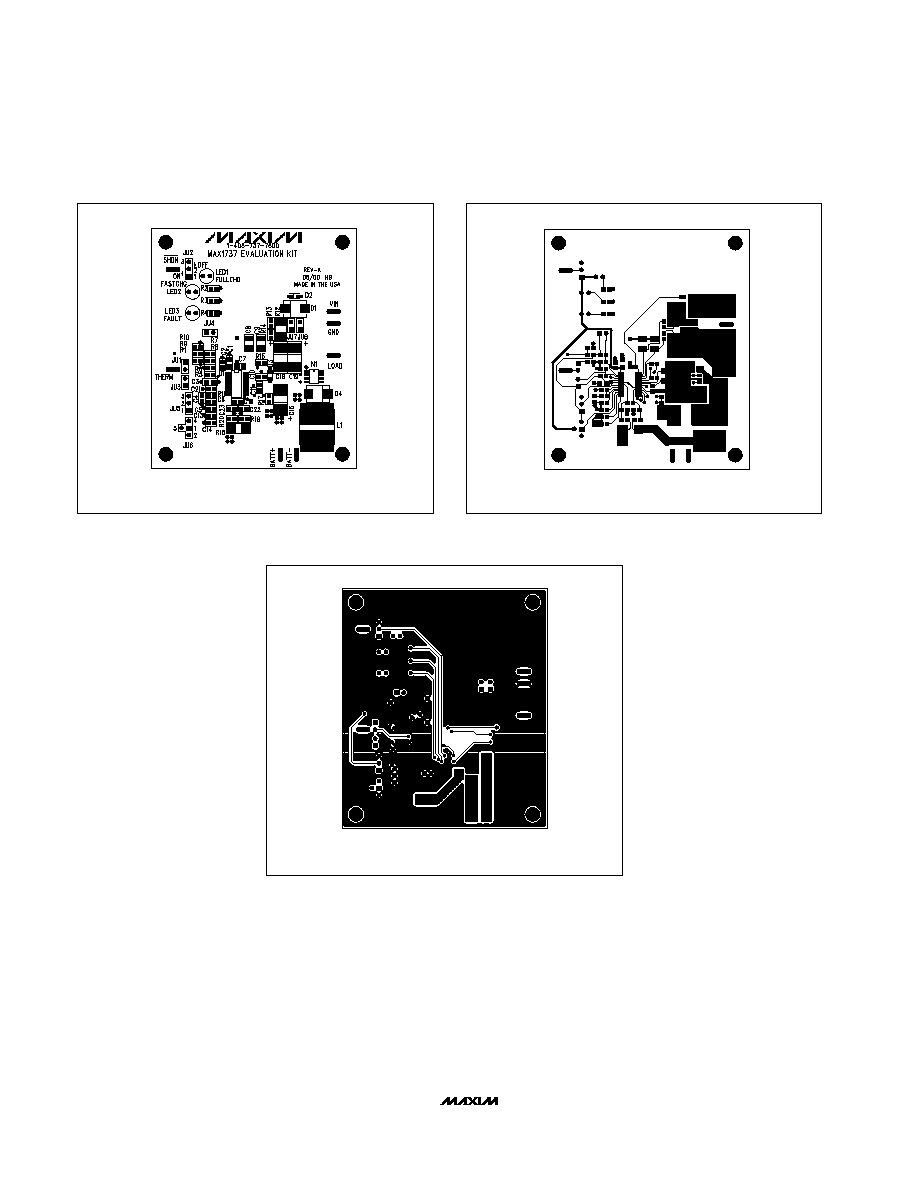
Figure 2. MAX1737 EV Kit Component Placement Guide--
Component Side
Figure 3. MAX1737 EV Kit PC Board Layout--Component Side
Figure 4. MAX1737 EV Kit PC Board Layout--Solder Side
ACTUAL BOARD SIZE IS
2.9in x 3.4in
ACTUAL BOARD SIZE IS
2.9in x 3.4in
ACTUAL BOARD SIZE IS
2.9in x 3.4in


